How'd it go today?

Looks like a duck to me:/:

You have successfully uncovered my hidden agenda Willie. My goal was to infiltrate an arborist forum, posing as a tree guy get them to accept me. Then, when their guard is down and they are haplessly surfing the internet, I would deliver my dastardly, yet brilliant coup de grace, fool them into thinking a picture of a duck was a bald eagle. It almost worked.:D
 
pulled off the hydro motor from the bottom chipper feed wheel. You can see where the metal is worn, but it's wierd that only that one spot is worn and not the whole area of the connection. I'm really hoping I don't have to replace the whole bottom feed wheel and motor.
 

Attachments

  • Chipper Feed Wheel Problem.JPG
    Chipper Feed Wheel Problem.JPG
    371 KB · Views: 14
  • Chipper Feed Wheel Problem (2).JPG
    Chipper Feed Wheel Problem (2).JPG
    378.8 KB · Views: 14
  • Chipper Feed Wheel Problem (3).JPG
    Chipper Feed Wheel Problem (3).JPG
    438.8 KB · Views: 14
  • Chipper Feed Wheel Problem (4).JPG
    Chipper Feed Wheel Problem (4).JPG
    340.6 KB · Views: 14
  • Chipper Feed Wheel Problem (5).JPG
    Chipper Feed Wheel Problem (5).JPG
    317 KB · Views: 14
Not really all that weird. It doesn't look like it uses a key? That's wierd.

I'm back from lunch with $160 in hydro oil for the grinder.
 
No, no pin. it uses a clamp that compresses the outer coupling onto the inner shaft. If morbark says I need to replace the whole bottom feed wheel and the motor shaft, I'm gonna try to clean it out well and reattach it, really cranking down on the clamp to see if that will buy me some more time. Before I took it apart, I really had no idea how everything was held together, and a few of the bolts that compress the clamp were loose. We'll see. I may have just needed to tighten that clamp more.
 
Yeah... We'll see. I want to make sure I don't F' myself further. Here is a pic kind of showing how it works.


I bet the dumbass I bought the chipper from didn't tighten it well enough when he replaced the bearings. He was saying that the lower bearing was the last thing he fixed on the chipper.
 

Attachments

  • Chipper Trouble (5).JPG
    Chipper Trouble (5).JPG
    290.3 KB · Views: 13
Ok, on the last picture, the motor is on the right, and all that slides over the shaft?

You shouldn't need to replace it, but I would knock off the high spots on the shaft and coupler so it can grip on the still clean surface.

Pretty stupid design, IMO.
 
got any emory cloth andrew? Clean it up....what the hay. sorry, chipper woes suck

4hrs of climbing, and three bids.................and a line on another honey be cut out:D
 
Ok, on the last picture, the motor is on the right, and all that slides over the shaft?

Yup. the rod coming out from the feed wheel goes inside, and the clamp is the two cylinders I'm holding, motor is on the right.

There really isn't anything sticking out that I could find, which is why I'm puzzled about what caused the wear in that spot. It's almost like there was just a ring of dirt there, or that the worn area must have been the only area where the rod and coupling made contact.

I agree about it being a lame design. Especially if it is designed to only have that small ring as the sole area of contact.

If I do decide to just reattach it a see, I'm going to hit it really good with brake cleaner, and see if I can get all and any lubrication out of that union.
 
If you tighten all those bolts up and it's still not tight enough you could try shimming it by taking a piece of real thin sheet metal and wrapping it around the tapered shaft part and then putting the cap on it. I've seen my Dad do stuff like that to extend the lives of components.
 
IMO it doesn't have to be emery cloth kinda smooth. Just knock down the spots in the groove that are higher than the rest of the surface. Doing this will make it grab on the rest of the surface which is more than enough contact area transmit the torque.

Don't use lube or antiseize between the shaft and the tapered clamp, obviously.
 
Andrew, it's not that uncommon for it to gall in one area. When I say knock down the high spots I mean make sure it's clamping elsewhere than just on a high, buggered up spot. Contact area is your friend. The whole surface should be grabbing like a bastard.

Yep Steeve, that'd work, but I doubt it's that far gone.
 
You have successfully uncovered my hidden agenda Willie. My goal was to infiltrate an arborist forum, posing as a tree guy get them to accept me. Then, when their guard is down and they are haplessly surfing the internet, I would deliver my dastardly, yet brilliant coup de grace, fool them into thinking a picture of a duck was a bald eagle. It almost worked.:D

:lol: Ha, the oldest trick in the book, my friend. You think you're dealing with amateurs here? :P
 
Today was a boring day. I had to stay home today. I ended up cleaning 2 saws, the 460 and 192. Since it was nice out I dragged out the compressor and really got em cleaned up. Also ordered more rope to play around with, mostly double braid and some tenex.
 
Knock down all the high spots then scuff up the entire area Andrew. Clean it all with brake clean then assemble it. The more friction, rough spots, the better!!

The genset is whipping me today! No fire, tore it down to the flywheel after I bypassed all the safety overrides. There was no ground wire on the coils! It's all done with the fuel shut off solenoid now?
Seems a chunk of crap got into the magnets and went around with the flywheel and killed the coils. I filed everything down, then sanded it. Did the same with the coils. No fire. Traked down a set of coils, $120 latter, no fire:? Went back and the tore another motor down, tested my old coil, they work fine:?
They think I have a flywheel problem, I have much to look into! But they did give me a refund on the coils I bought:)
 
Just to clarify, scuff to break the glaze, not to actually make it rough to the touch like sandpaper. A flap wheel in a drill should make short work of the coupler piece, however sand paper would do as well.

Better you than me, Andy. Still I hope you figure it out soon, those engines can be a real PITA to work on.

Monkey, are you taking the rest of the week off? :D

I changed the hydro filters, dumped and replaced the resevoir on the grinder. Started eyeballing the fluid for bar oil which would offset the entire cost of the hydro fluid ($8 a gallon for the fluid, bar oil is $9-10). The only down side is it's enough to last me a few years.

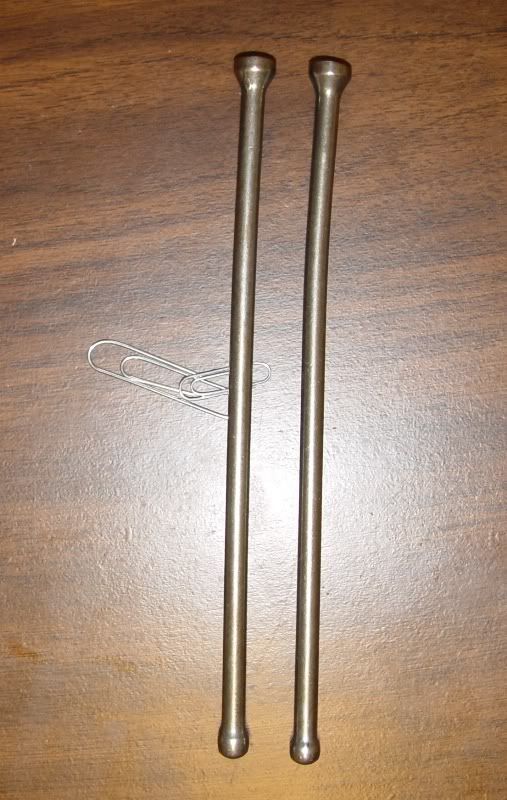
Here's the two bent push rods.
DSC05539.jpg
 
Pruned a couple of elms and a couple of maples today and took out one poplar. All by lunch and got a big tip and compliment too.8)
 
Slopes on ropes today. Repelled down an eroding bank and dropped brush and trees above a house.. Had a great time :D Home owner took some pics and is e mailing them to me. Going back tomorrow. We had a late start due to serious delays buying shat on the way there. Lines lines :P Still ahead of schedule on the estimate :D
 
We did a couple of trims today about 20 miles apart. I had a doctors appointment this afternoon for my blood pressure. It was OK and the doc had me do a PSA test at the lab on the way out. Went and picked up the guys and the truck and here I am.
 
We did a little of this and a little of that. Today mostly just payed the bills. I got the bid I didn't want and haven't heard from the one I want. The wind is still howling outside and will probably send some more trees over tonight.
 
pretty good day here, spent the morning in DMV about 3 trucks. gotta go back tomorrow for 1, if id have paid today, I would have lost a whole quarter! Got 2 bids out waiting there:) my buddy found an electric dump truck with out a battery for trevin so i got it together and rigged up a battery. vids to come8)
 
I went to the chiropractor fo the first time today....I am a believer, no sciatic pain whatsoever:D

Then I went to a friends "citizen pruner" program in a nearby city to see how he runs the program..I am doing one for our citizens on saturday, should be fun:roll:
 
Back
Top